Why Are My PEX Connections Leaking? Diagnose It by Fitting Type
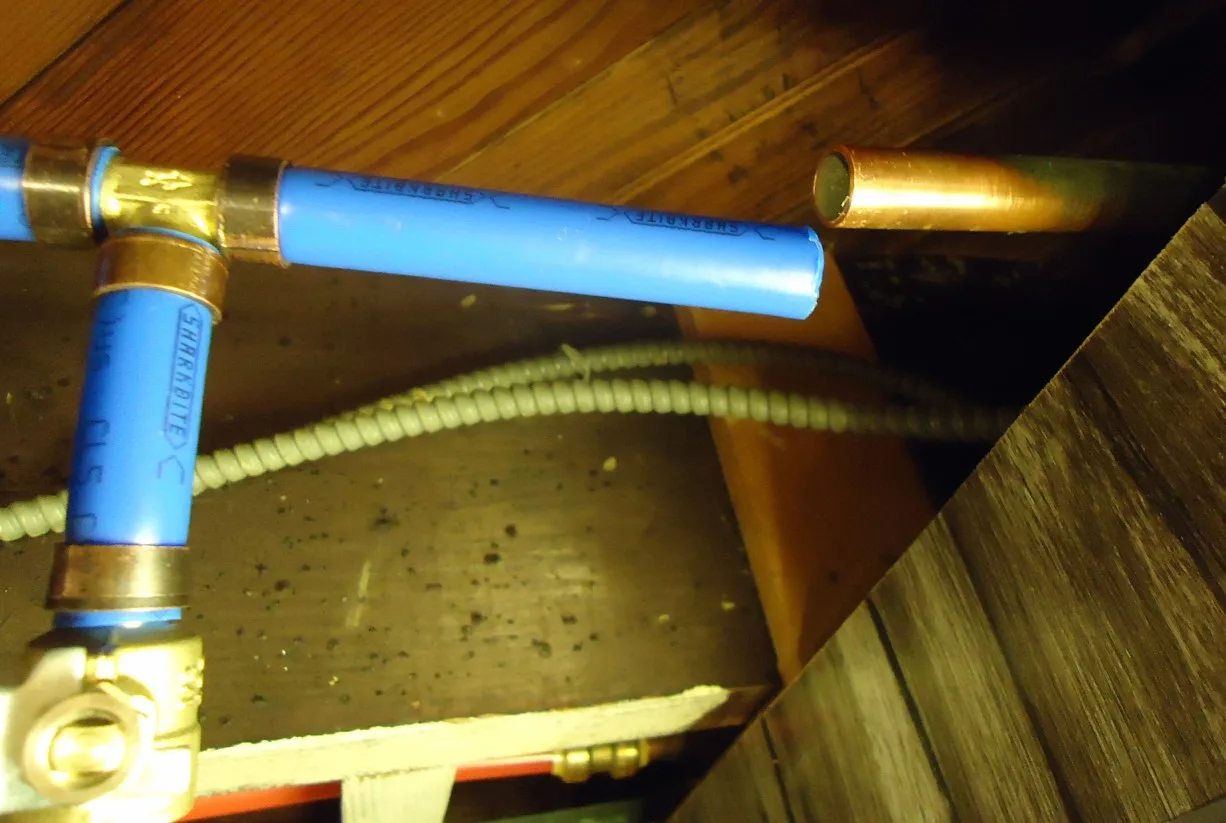
When a PEX connection leaks, the manufacturers' own instructions point to a short list of causes, nearly all of them in how the joint was made: a ring in the wrong spot, a tool out of calibration, a cut that was not square, pipe that was not pushed fully home, or a part that does not belong with that fitting. The fix is the same for nearly all of them, cut out the joint and make a new one, but you need to find the cause first or the new joint will leak the same way.

✓ Checked by a licensed plumber Kevin Orr, Texas Master Plumber License M-47441 (look it up)
Last reviewed
In this guide
- First, identify which connection you have
- When it started leaking tells you a lot
- Copper crimp rings
- Stainless cinch clamps
- Expansion (F1960) joints
- Push-to-connect fittings
- When the pipe, not the joint, is the problem
- Finding the leak and checking the repair
- When to call a plumber
- Frequently asked questions
- Sources
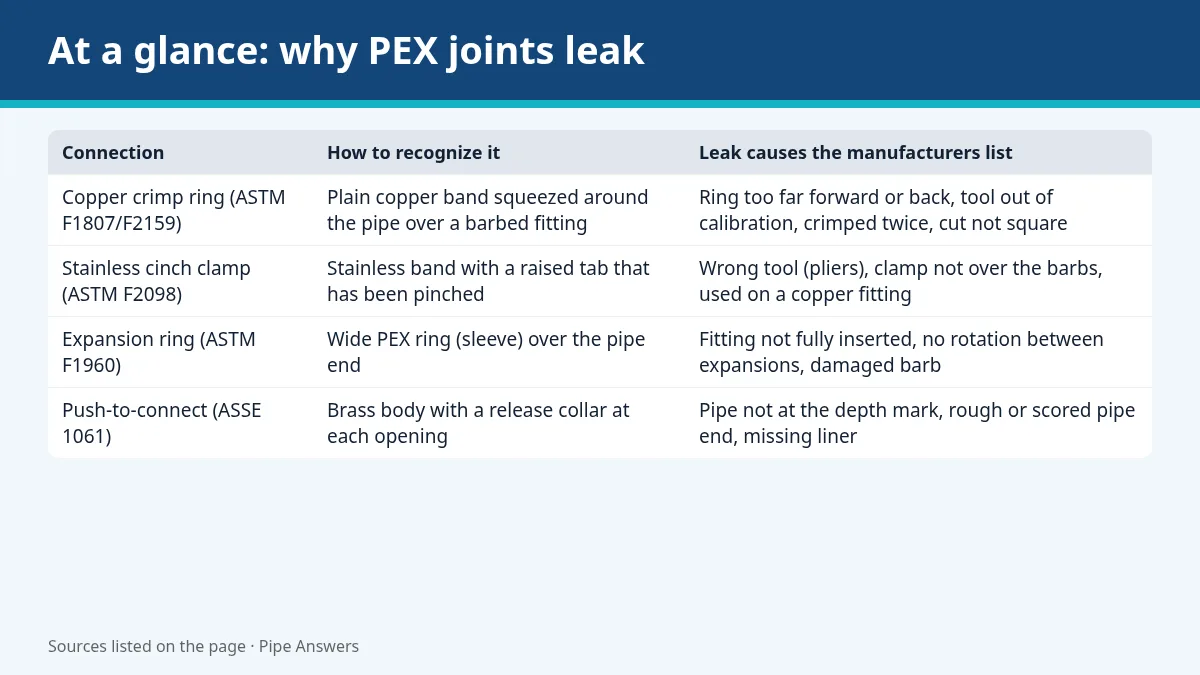 Graphic: summary of this guide, made by our team from the cited sources.
First, identify which connection you have
| Connection | How to recognize it | Leak causes the manufacturers list |
|---|---|---|
| Copper crimp ring (ASTM F1807/F2159) | Plain copper band squeezed around the pipe over a barbed fitting | Ring too far forward or back, tool out of calibration, crimped twice, cut not square |
| Stainless cinch clamp (ASTM F2098) | Stainless band with a raised tab that has been pinched | Wrong tool (pliers), clamp not over the barbs, used on a copper fitting |
| Expansion ring (ASTM F1960) | Wide PEX ring (sleeve) over the pipe end | Fitting not fully inserted, no rotation between expansions, damaged barb |
| Push-to-connect (ASSE 1061) | Brass body with a release collar at each opening | Pipe not at the depth mark, rough or scored pipe end, missing liner |
When it started leaking tells you a lot
- The moment the water went on. Something basic was missed: the fitting is not fully inserted, the ring is not over the barbs, the push fitting is not at its depth mark, or the cut was crooked. Sioux Chief and SharkBite both say to pressure test completed joints, because these are the faults a test is meant to catch.
- Days or weeks later. Think marginal crimp or stress. SharkBite's PEX installation guide warns that clamp and crimp tools out of calibration may not make good long-term connections and can result in leaks developing over time. The same guide says not to pull pipe tight at connections. A pipe stretched between fittings, or a shower or hose bibb connection without a strapped fitting, keeps a load on the joint.
- After a cold snap. SharkBite describes its PEX as freeze resistant but not freezeproof, warns that frozen pipe may damage joints or manifolds, and asks installers to pressure test, inspect and repair systems that have frozen before putting them back in service. If you suspect freezing, see our guide on whether pipes are frozen or the water is off.
- After other trades worked nearby. Watts lists chemicals that can compromise its plastic (polysulfone) fittings, including pipe dope, leak check compounds, bug spray, paint, solder flux, plastic pipe primers and cements, and spray foam insulation. It warns that exposure can result in leaks.
Copper crimp rings
The Sioux Chief crimp ring connection guide lists the mistakes that leave a leak path:
- Tube not cut squarely, so the ring cannot compress the tube for a secure seal.
- Fitting not pushed completely into the tube.
- Ring placed too far forward or too far back, so it is not over the sealing barbs.
- A tool out of calibration that does not compress the ring enough.
- Jaws that did not engage the whole ring.
- A ring that was crimped more than once.
The ring should sit 3/16 inch (plus or minus 1/16 inch) from the end of the tube. Watts and SharkBite express the same window as 1/8 to 1/4 inch from the end for their clamps and rings. Look closely at a leaking joint: a visible gap between the end of the pipe and the shoulder of the fitting, or a ring sitting well back from the pipe end, matches two of the faults on that list.
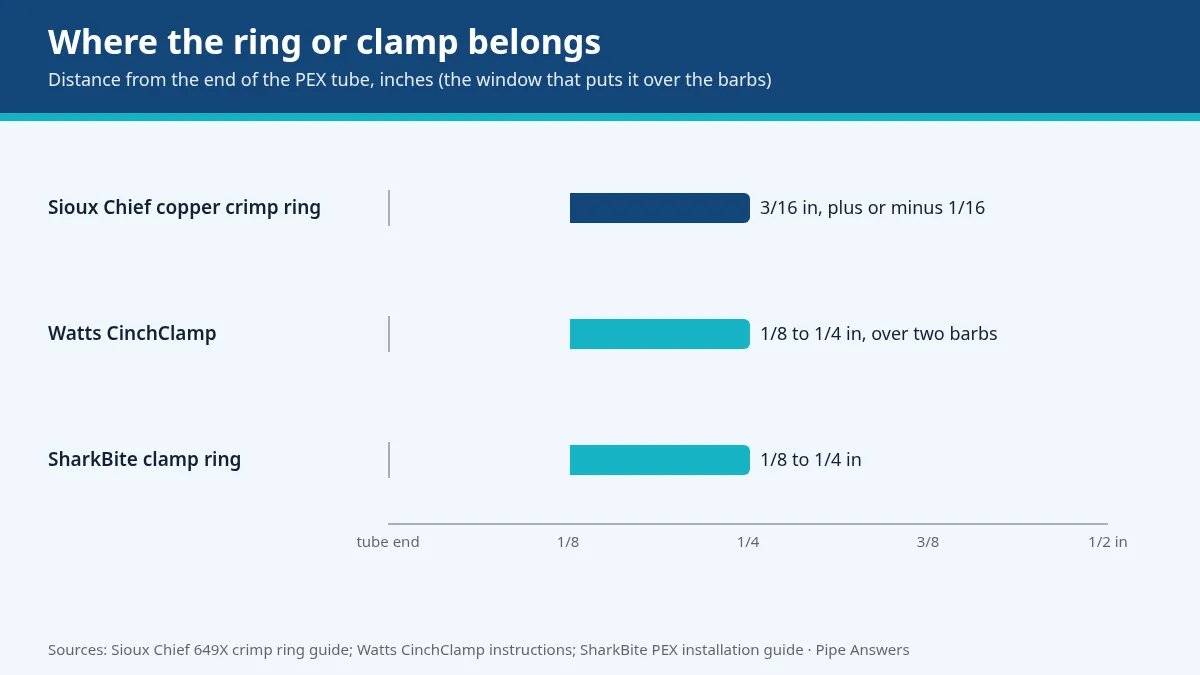 Graphic: made by our team from the Sioux Chief, Watts and SharkBite installation instructions linked on this page.
What the go/no-go gauge is telling you
Crimp tools come with a slotted gauge; Sioux Chief says all of its crimp tools include one. The Sioux Chief PowerPEX installation manual explains the three results:
- The ring slides in and stops in the GO area. Good crimp, no calibration needed.
- The ring is too big to enter the slot. Under-crimped. The tool needs adjusting to compress more.
- The ring slides into the NO GO area. Over-crimped. The tool needs adjusting to compress less.
Sioux Chief adds two details people miss: do not gauge where the jaw marks show on the ring, and test at least the first and last crimp of the day. If the tool still will not make good crimps after calibration, it is likely worn and should be replaced. A ring that fails the gauge is not squeezed again. Cut the joint out, fix the tool, and make a new connection.
Stainless cinch clamps
The Watts CinchClamp instructions are blunt about the tool: use an approved ratcheting tool made for ASTM F2098 clamps, because other tools, such as pliers, result in an improper fit and possible leaks. Other points from the same sheet:
- Cut the tube square and remove any burrs.
- Push the fitting in until the tube stops on the fitting shoulder, then set the clamp 1/8 to 1/4 inch from the tube end, directly over two barbs.
- Never use cinch clamps on PEX fittings made from copper. Watts says leaks may result; use brass or polysulfone insert fittings.
- Below 30°F, make the connection slowly so the PEX has time to form a seal against the barb.
- Verify the connection by checking that the finished tab matches the shape shown in the instructions.
Expansion (F1960) joints
Expansion joints are made by stretching the pipe and a PEX ring, inserting the fitting, and letting the PEX shrink back around it. The PowerPEX manual lists the failure points: the pipe not cut squarely, the tube not inserted fully into the sleeve, the fitting not inserted fully, a damaged or grooved barb, and a tool that was not rotated between expansions. That last one leaves a groove inside the pipe that becomes a leak path. Sioux Chief recommends removing any rings that expanded unevenly.
Cold matters here too. Below 55°F, Sioux Chief says to expand slowly and not force the tube onto the expansion head, to keep sleeves warm (it suggests a pocket), and never to make connections below 5°F. It also warns against warming the joint with a heat gun.
Push-to-connect fittings
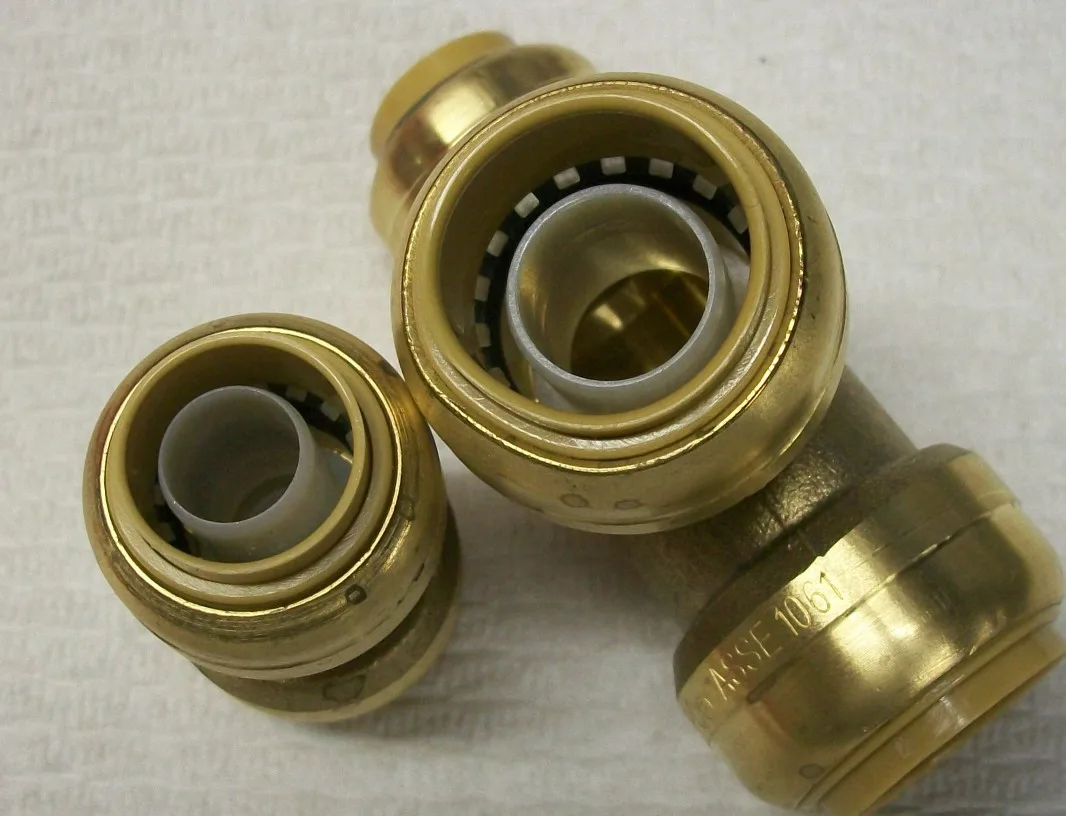
Push fittings seal with an o-ring on the outside of the pipe, so the pipe surface and the insertion depth decide whether they hold. The SharkBite push-to-connect pocket guide calls for a square cut, inspecting the fitting and pipe for damage, dirt and debris, and marking the insertion depth on the pipe. The mark should rest against the edge of the release collar once the pipe is pushed in. If the mark is visible away from the collar, the pipe is short of the seal.
The SharkBite PEX installation guide adds that pipe with rough edges, cuts or abrasions can damage the o-ring and cause the fitting to leak, and that the support liner inside the fitting must be in place for PEX because it keeps the pipe wall from collapsing. On 1-1/4 inch and larger PEX, the pocket guide says a stiffener must be fully inserted before the connection is made. SharkBite also says its brass push fittings are meant to be permanent and are not designed for repeated connection and disconnection.
When the pipe, not the joint, is the problem
- Sunlight. SharkBite says not to store or install PEX where it is exposed to direct or indirect UV light. The Sioux Chief manual explains that PEX carries a code that includes its tested UV limit, and the SharkBite pocket guide calls six months the highest available rating, so pipe left outside during a long job can be past its limit before it is ever buried in a wall.
- Kinks and crushing. SharkBite says damaged or kinked sections should be cut out and replaced, and not to crush or kink the pipe. A kink near a fitting stresses the joint.
- Expansion and contraction. PEX grows about 1.1 inches per 100 feet for every 10°F rise in temperature, according to Sioux Chief, which recommends allowing 1/8 inch of slack per foot of run and not clamping supports too tightly. A hot line pulled tight between two fittings loads those joints every time it heats and cools.
- Stress at fixtures. Sioux Chief says to use a fitting with a strapping point, such as a drop-ear elbow, where a joint will take undue stress, for example at a shower arm or hydrant.
- Pressure and temperature. The PowerPEX tube rating falls as temperature rises: 160 psi at 73.4°F, 100 psi at 180°F. If your pressure is high enough that pipes bang when valves close, read our guide on pipes that bang when the water shuts off, which covers testing your static pressure.
Finding the leak and checking the repair
SharkBite's pocket guide recommends dish soap and water to find a leak on a pressurized joint, and specifically says not to use products made for leak detection. That lines up with the Watts warning that leak check compounds can damage plastic fittings. Dry the joint with a paper towel, then watch it with the water on. A bead forming at the ring edge or the release collar tells you which joint and which side.
Once you know the cause, the repair is a fresh joint: shut off the water, cut out the bad connection, cut square with a PEX cutter, and remake it with the right ring, tool and depth. Gauge it or check the tab, then put the water back on and watch it for a few minutes. If one fixture has weak flow after any plumbing work, our guide to low water pressure at one faucet walks through the checks.
When to call a plumber
- More than one joint is leaking, or joints made with the same tool keep weeping. The tool, the parts or the method is wrong across the whole job.
- The leak is inside a finished wall, ceiling or under a slab. Sioux Chief says not to make fitting joints under a slab at all, so a slab leak calls for a professional.
- You cannot tell which connection system you have, or the fittings are mixed brands and ring types.
- The pipe froze, or a leak has already soaked drywall, subfloor or insulation.
Frequently asked questions
Can I just crimp a leaking PEX ring again?
No. Sioux Chief says to compress a copper crimp ring only once and warns that rings compressed multiple times may develop a leak path. A bad joint is cut out and remade with a new ring, after the tool has been checked and calibrated.
Why did my PEX joint start leaking weeks after it was installed?
A joint that held at first and then wept usually had a marginal crimp from a tool out of calibration, or it is under stress. SharkBite warns that out-of-calibration tools may not make good long-term connections and can result in leaks developing over time. Also look for a pipe pulled tight at the fitting, or a fixture connection with no strapped drop-ear fitting.
Do I need a go/no-go gauge for cinch clamps?
Not usually. SharkBite says a properly calibrated clamp tool eliminates the need to gauge each ring, and Watts says to verify the connection by checking the shape of the clamp tab. Copper crimp rings are different: those should be gauged.
Can PEX fittings be reused?
Crimp, clamp and expansion joints are cut out, not reused. SharkBite says its brass push fittings are intended to be permanent and are not designed for repeated connection and disconnection after the initial install.
Smell gas? Leave the building without switching anything on or off, then call your gas utility or 911 from outside.
Know your shutoff. Find your home’s main water shutoff before you need it. Most fixtures also have their own small valve.
Sources
- ASTM F1807/F2159 Copper Crimp Ring Connection Guide, Sioux Chief (PDF)
- PowerPEX Installation Manual, Sioux Chief (PDF)
- Making PEX Connections with CinchClamps, Watts (PDF)
- SharkBite PEX Installation Guide (PDF)
- SharkBite Push-to-Connect Installer Pocket Guide (PDF)
Spotted an error? See our corrections policy or email contact@pipeanswers.com.

Pipe Answers Editorial Team
Our editors build each guide from the sources listed above and check every claim and number against them before publishing. How the team works
Kevin Orr
Expert Reviewer, Plumbing
Texas Master Plumber License, M-47441 · Verify license
Kevin Orr is a Texas Master Plumber, a U.S. Army veteran and the owner of a plumbing company. In his view, good plumbing is more than fixing pipes. It means showing up when you say you will, explaining what needs to…
Related guides
-
 Leaks & Pipes
Why Is My Water Bill So High All of a Sudden? Check the Bill, Then the Meter
A sudden jump in your water bill is a reading problem, a usage change, or a leak. How to read the bill, run the meter test, and find the leak before the next cycle.
-
 Leaks & Pipes
Why Do My Pipes Bang When I Turn Off the Water? Water Hammer Explained
A single bang the instant a faucet or washer shuts off is water hammer. How to confirm it, check your water pressure, and choose the right ASSE 1010 arrestor.
-
 Leaks & Pipes
Water Under the Kitchen Sink but No Leak? Find the Source by Timing
Water in the sink cabinet with no drip in sight? When the puddle appears tells you the source: supply line, sprayer hose, drain, dishwasher hose, sink seam or sweating pipes.
-
 Water Heaters
Why Is My Tankless Water Heater Running Out of Hot Water?
A tankless heater has no tank to empty. Hot water fades when demand beats its gallons per minute, winter inlet water is colder, or a filter, scale or gas line is choking it.